
お問い合わせフォームって、必要なんだろうか?

どうやって設置したらいいかわからない。

そんな悩みを解決します。
本記事を読めば、
「設置理由」「設置方法」「対処方法」まで
お問合せフォームのについて、全体を理解することができます。
この記事を書いた人

ゆめ ただ
グログ歴 5年目。
普通のビジネスマンとして働きながらFIREを目指す。
独学でゼロからブログを立ち上げる。
Dockerのローカル仮想環境を作りLinux環境も触るように。
4年目でSEO検定1級に合格し地道にスキルアップ。
次はWordPress以外のCMSに手を出そうか悩み中。
お問合せフォームとは?
お問合せフォームとは、サイト運営者に対して、
サイトを訪問したユーザーが問合せができるページのことです。
問い合わせしたい内容を記入して送信ボタンを押すと、
メールがサイト運営者宛てに送信される仕組みです。

お問合せフォームは必要か?
お問合せフォームは必要です。
ただし安易に設置すると、痛い目にあう場合があります。
それは、スパムメールの標的にされてしまうからです。

お問合せフォームが必要な理由
様々な問合せ窓口のため
あなたのサイトを訪れたユーザーから、様々な意見や情報が得られる可能性が広がります。
新しい仕事の相談など、将来を変えるような問合せもあるかもしれません。
一度設置してしまえば、24時間ユーザーが問合せしたいときに受け付けることが可能です。
コールセンターのように人を雇う必要もありません。
サイトの可能性を広げるためにも、ぜひ問合せ窓口は設置しましょう。

Google Adsenceに必要
Googleアドセンス※の審査を受けることを考えている方もいるでしょう。
審査通過のための条件として、お問い合わせフォームの設置は必要です。
個人サイトだからこそ、信頼性を向上のためにぜひ設置しましょう。
※Googleアドセンスとは、Google広告を自サイトに掲載するアフィリエイト手法のこと

お問合せフォームの設置方法【図解】
Contact Form7の導入
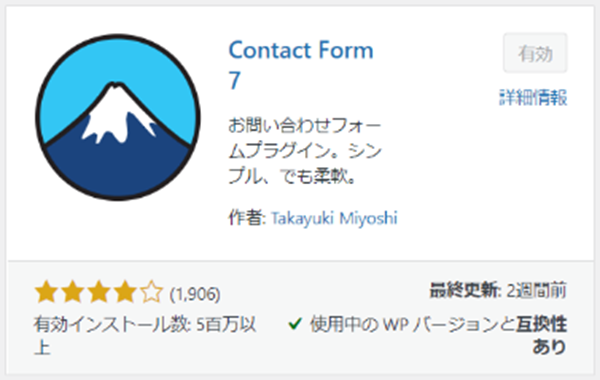
Contact From7プラグインのインストール&有効化
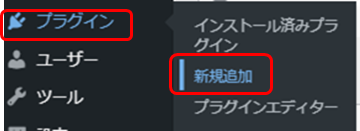
WordPressの管理画面がら、「プラグイン」―「新規追加」を選択します。
インストールして有効化します。

ページタイトルの設定
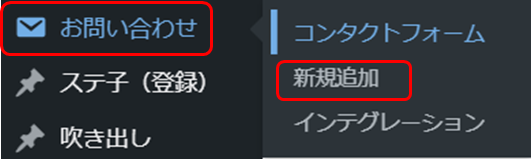
インストールが完了すると、WordPressの管理画面に
「お問い合わせ」メニューが表示されます。
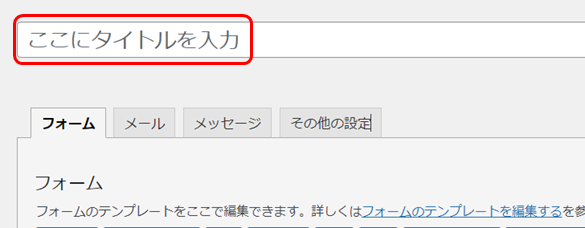
「ここにタイトルを入力」のところに、
ページタイトルを入力し設定します。
例:「お問い合わせページ」
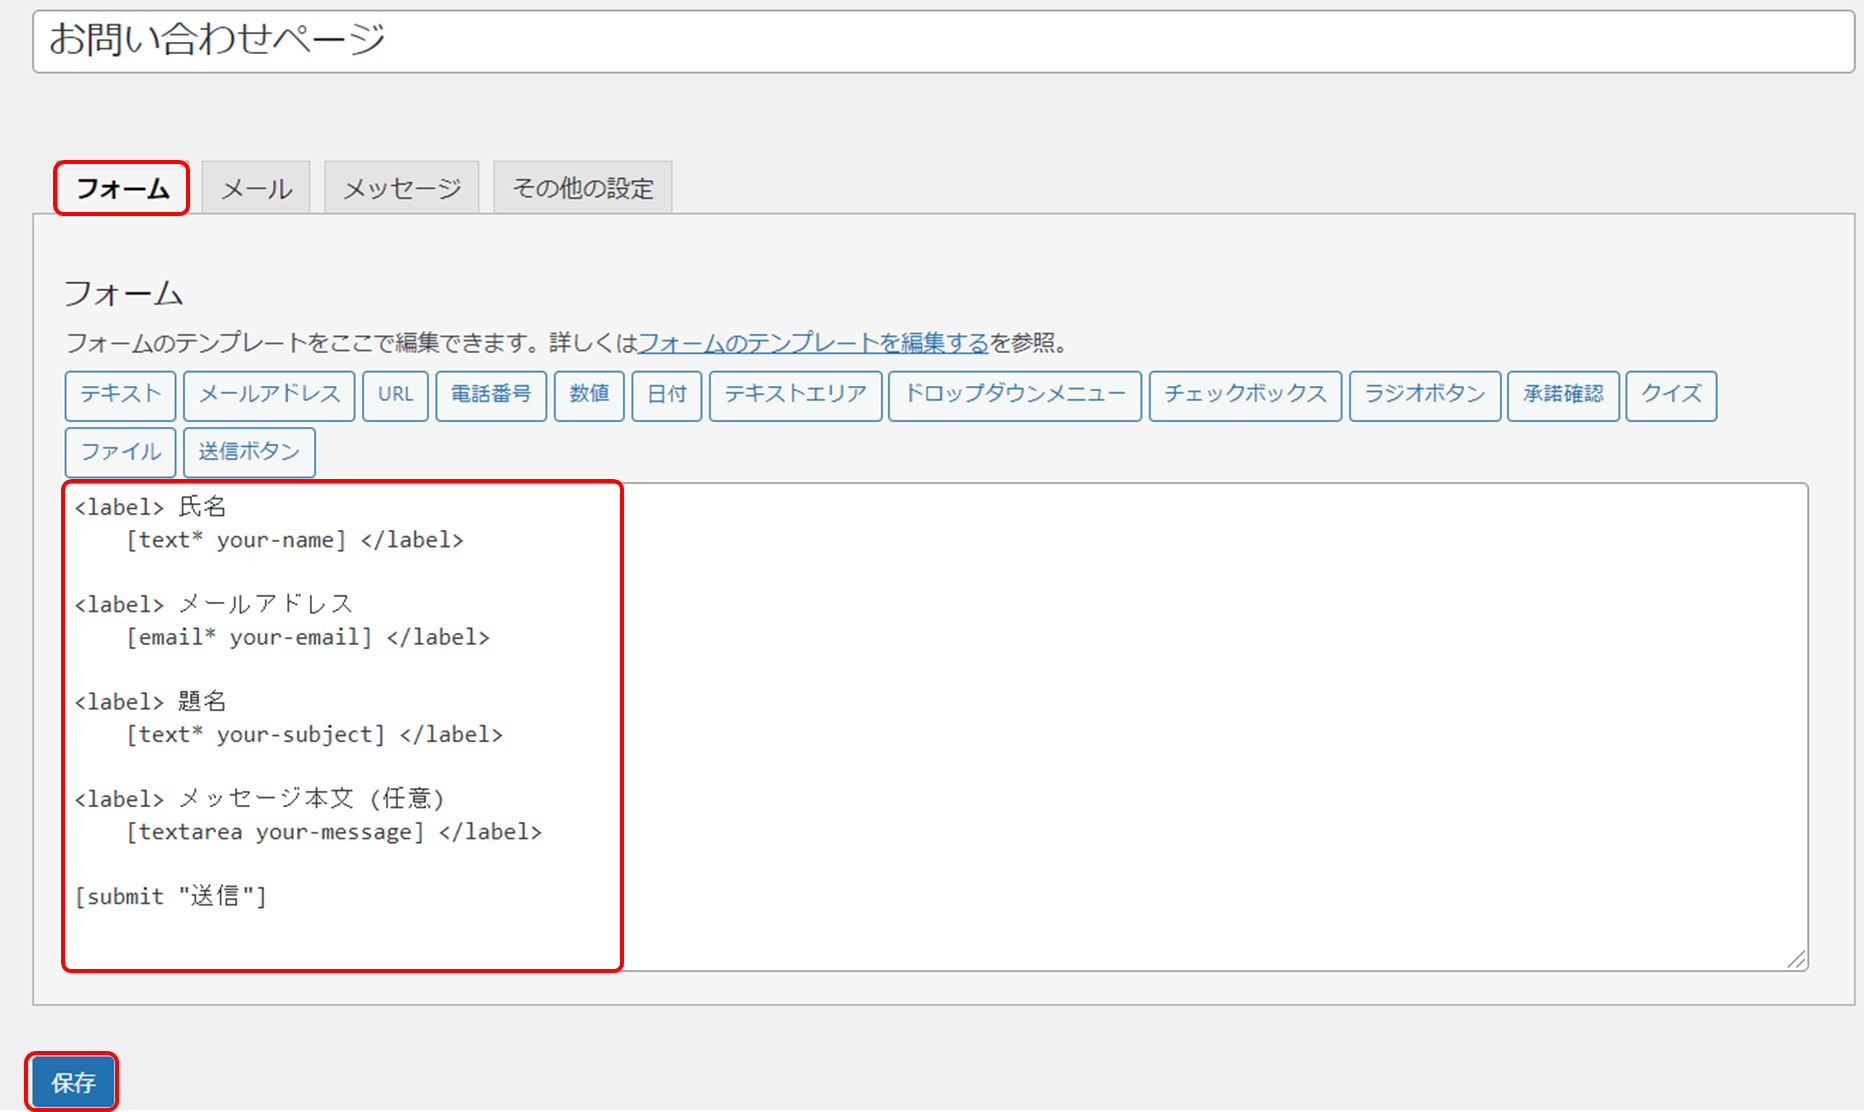
フォーム設定
デフォルトで、
「氏名」「メールアドレス」「題名」「メッセージ本文」「送信ボタン」
の設定が記述されています。
「保存」をクリックします。
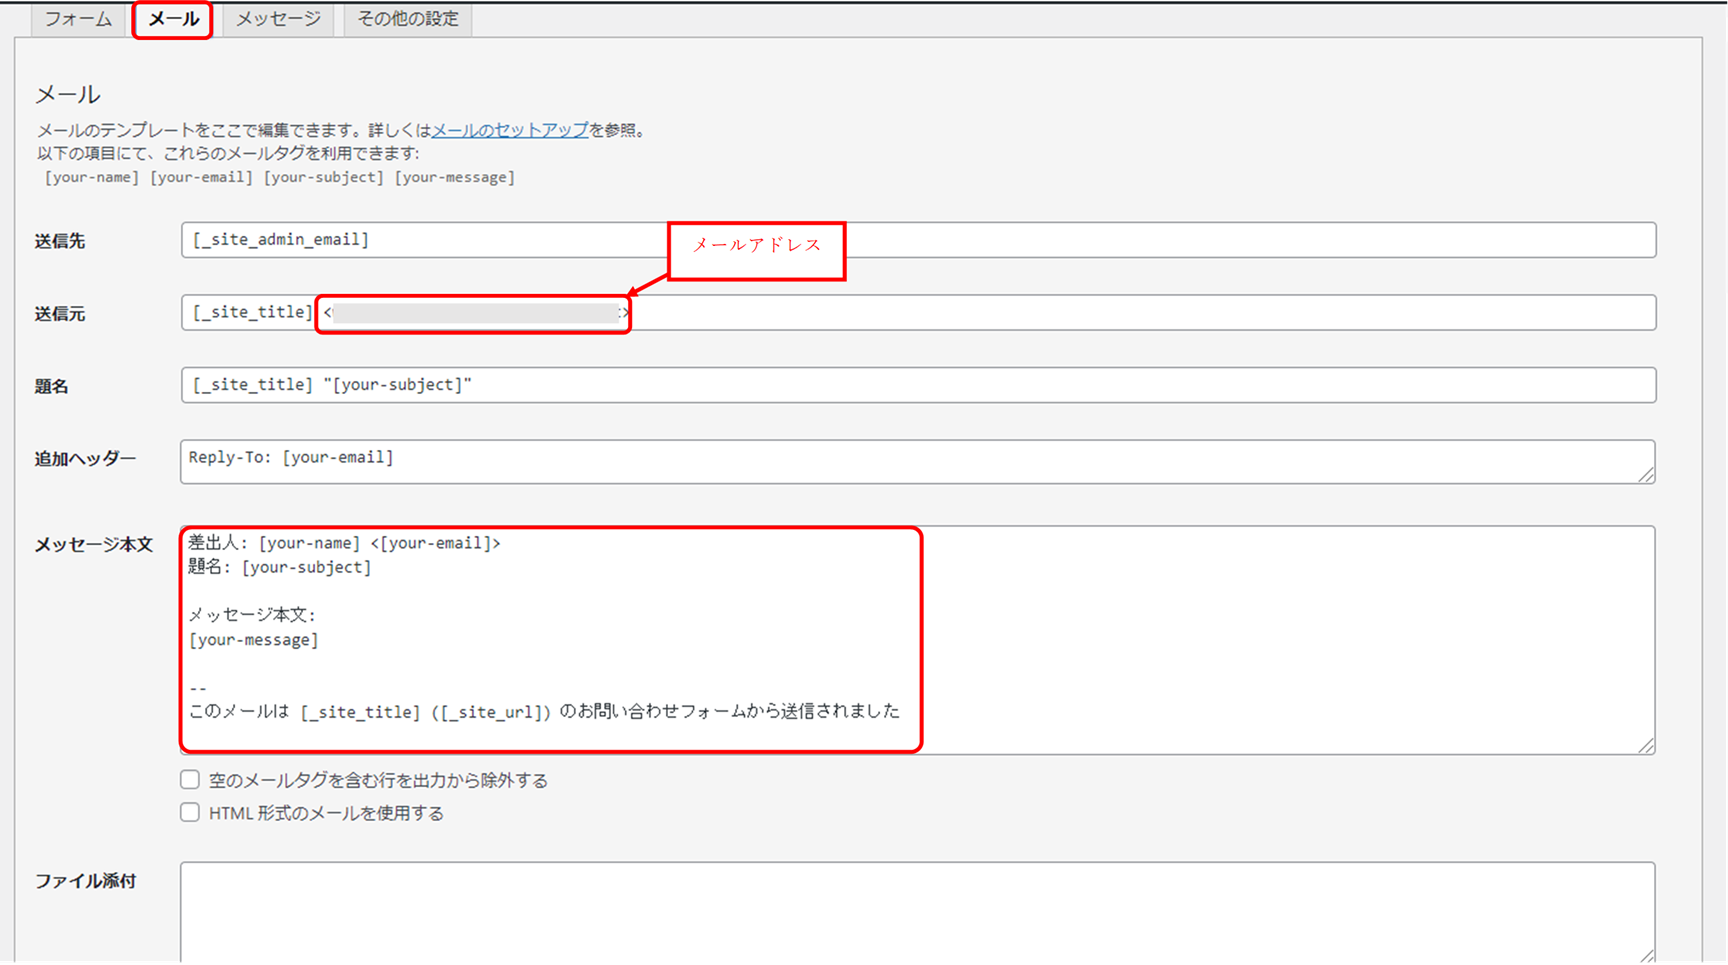
メール設定
メールタブに切り替えます。
送信元のところに、送信メールアドレスを設定します。
メッセージ本文等は、デフォルトのままでOKです。
設定完了したら、「保存」をクリックします。
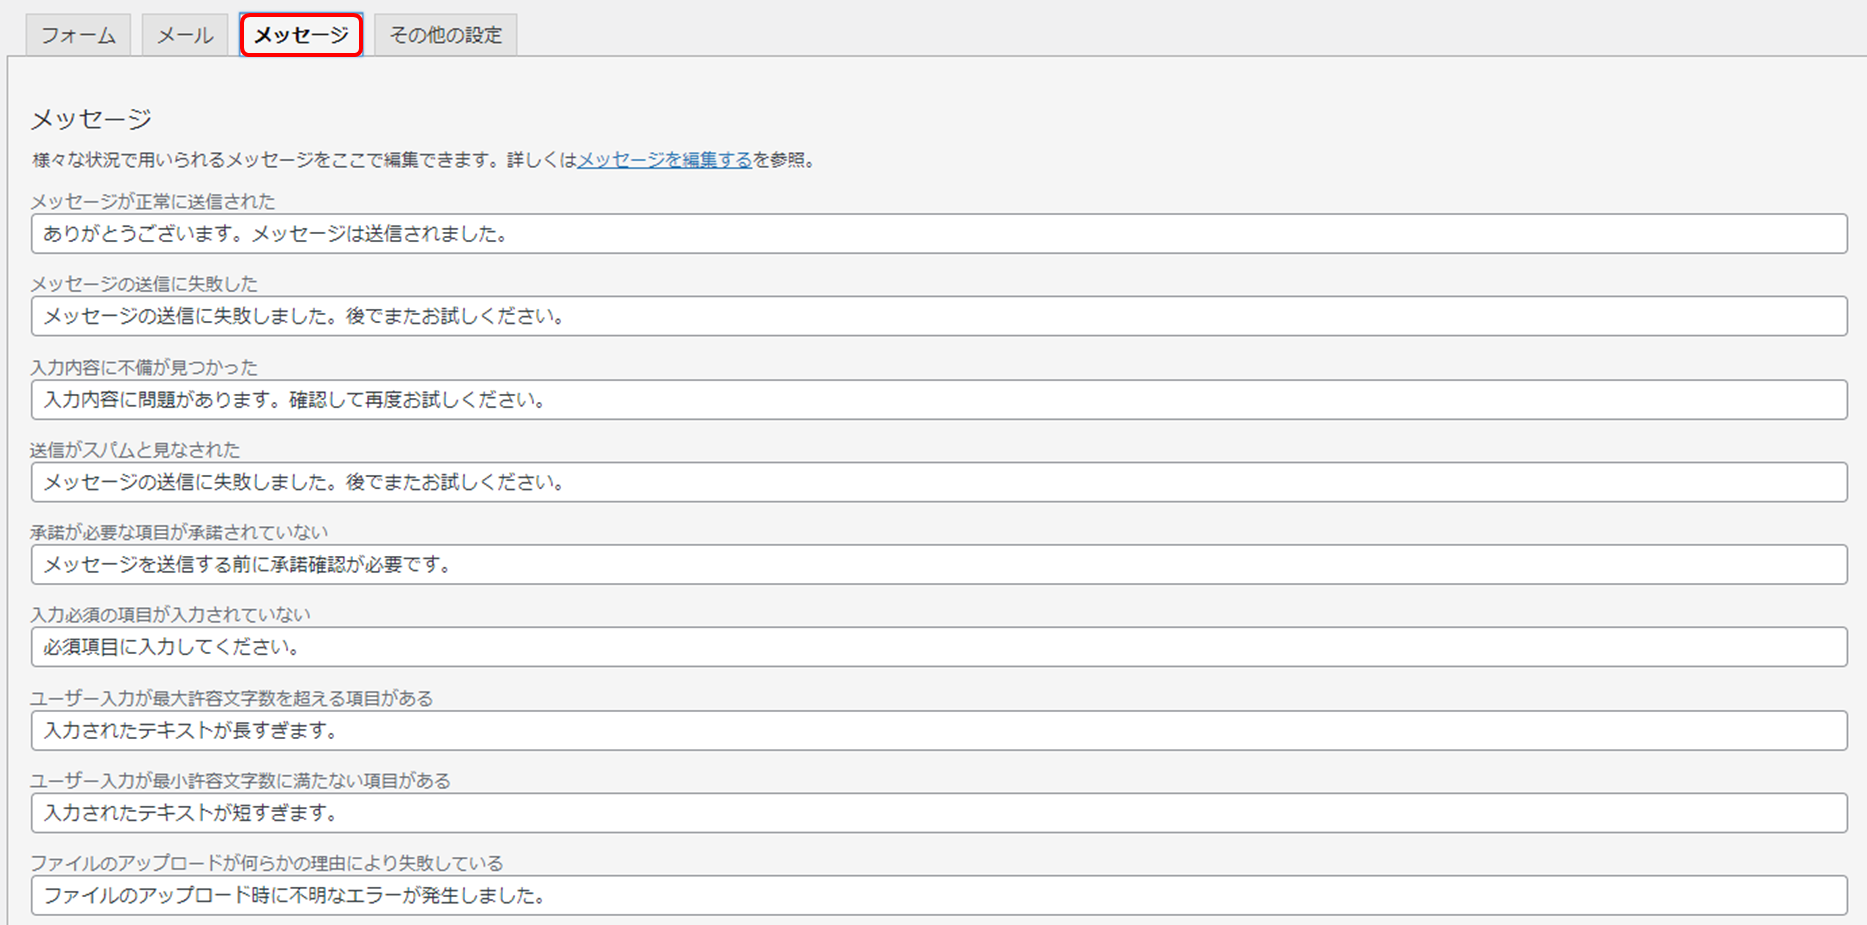
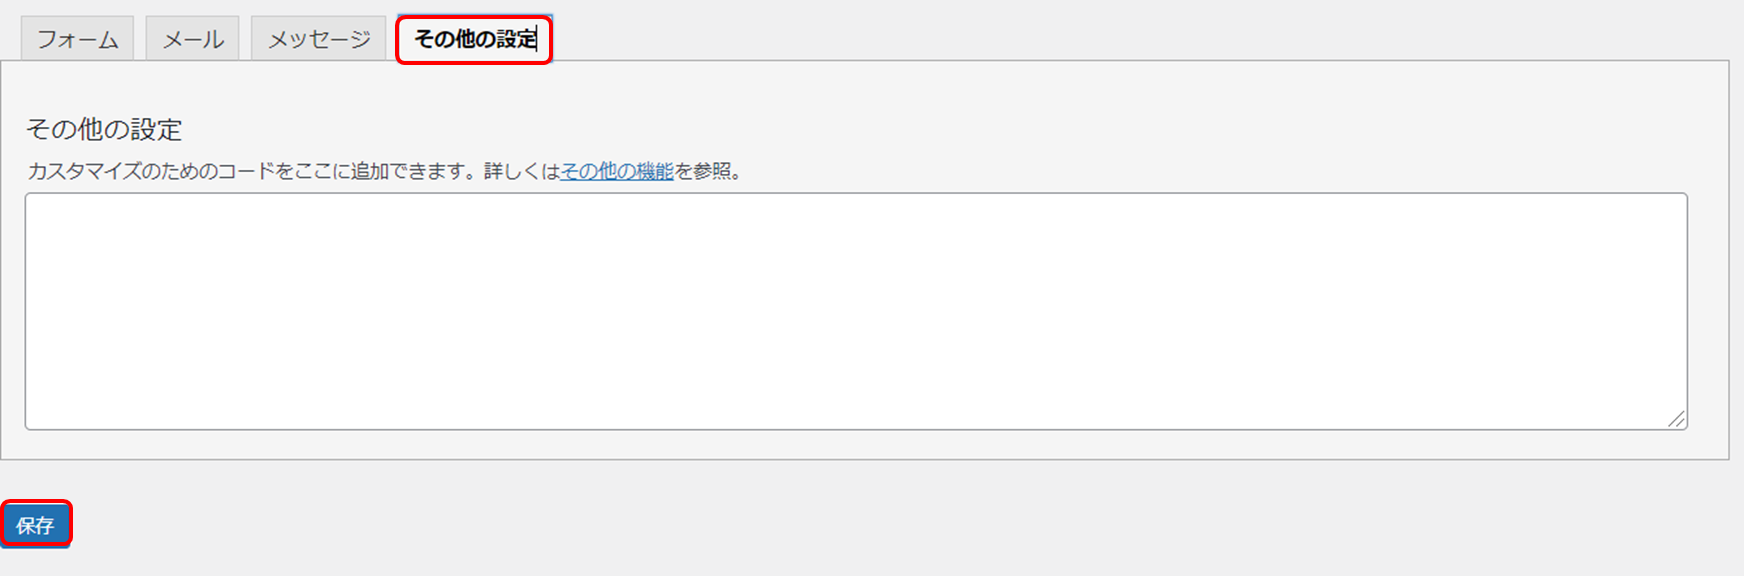
メッセージ設定
これらもデフォルトでOKです。必要に応じて変更します。
良ければ、「保存」をクリックします。
その他の設定
必要に応じて、カスタマイズ用のコードを追加でます。
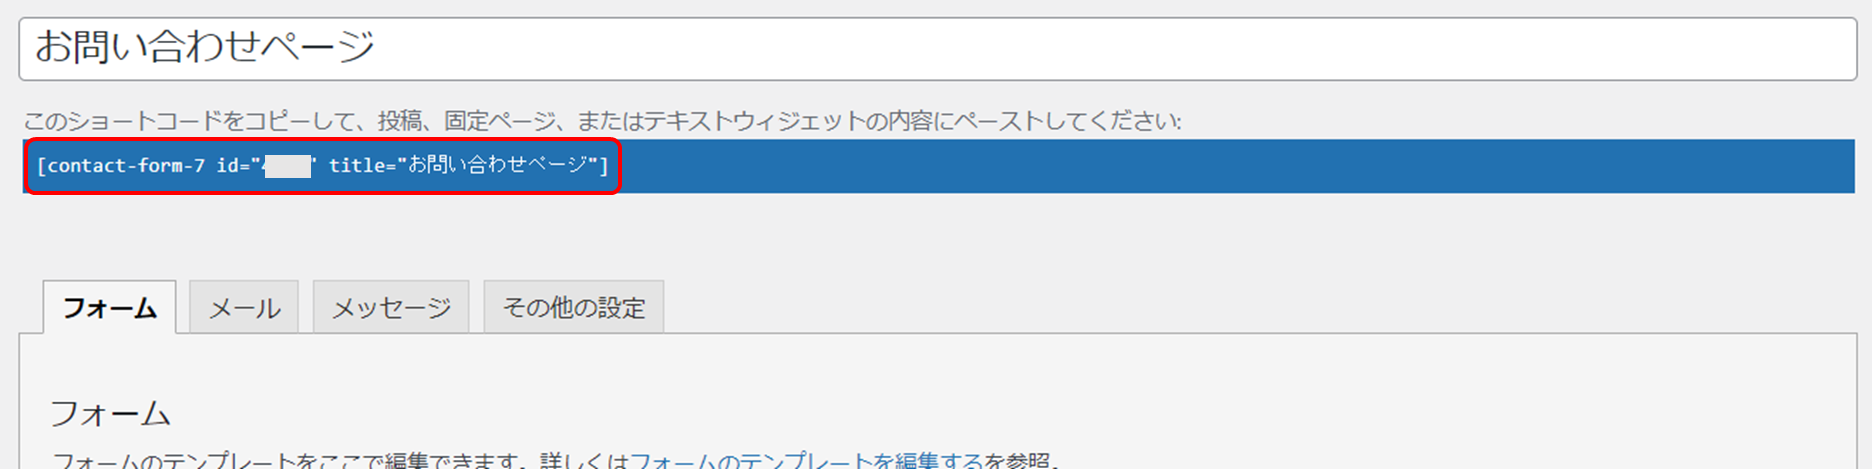
ショートコードのコピー
保存が完了すると、設定ページの先頭に、
ショートコードが表示されます。
これをコピーしておきます。(後ほど使用します)
保存の確認
管理画面の「お問い合わせ」を再度クリックし、
保存したフォームが表示されていればOKです。

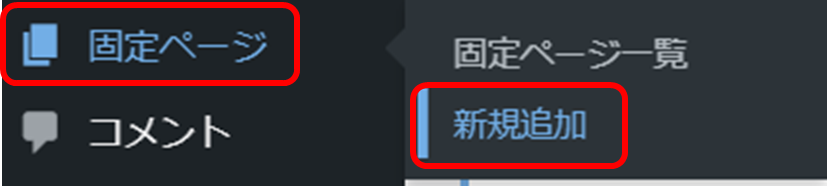
固定ページの作成
WordPress管理画面から、「固定ぺージ」―「新規追加」をクリックします。
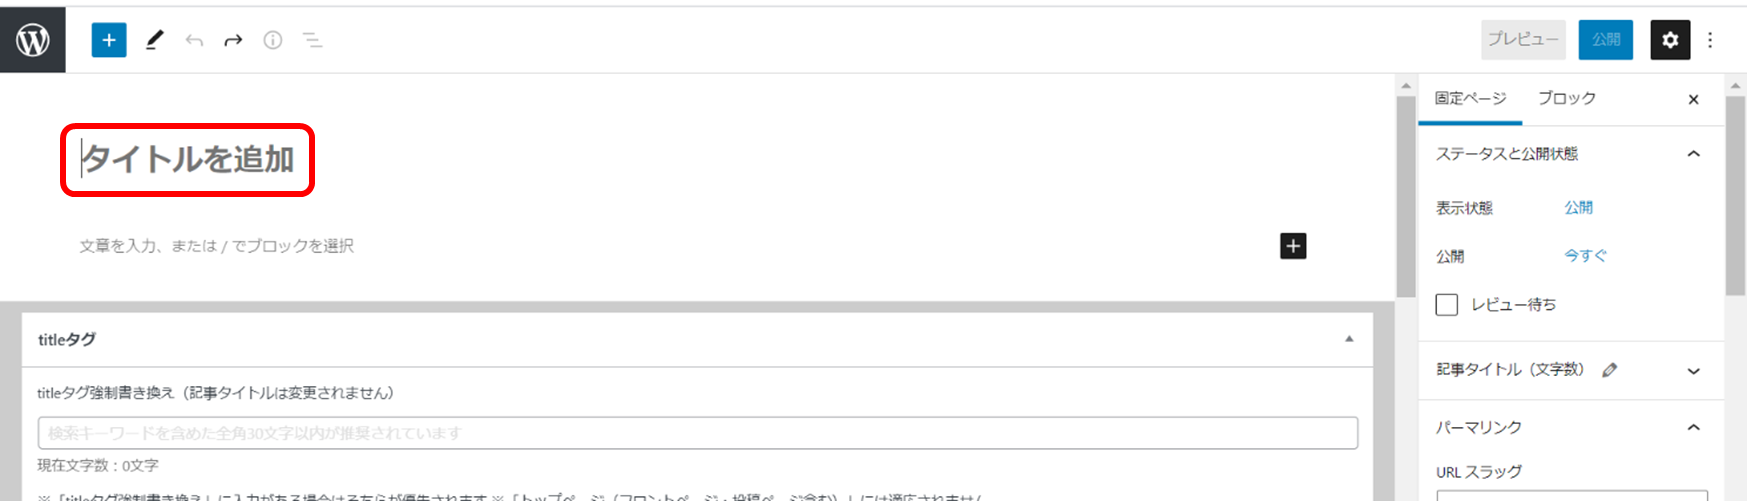
タイトルの設定
固定ページのタイトルを設定します。
「タイトルを追加」のところに、
設定したいタイトルを入力します。(例:お問い合わせページ)
ショートコードの設定
先ほどコピーしておいたショートコードを貼り付けます。
ブロックの追加から、「ショートコード」クリックして追加します。
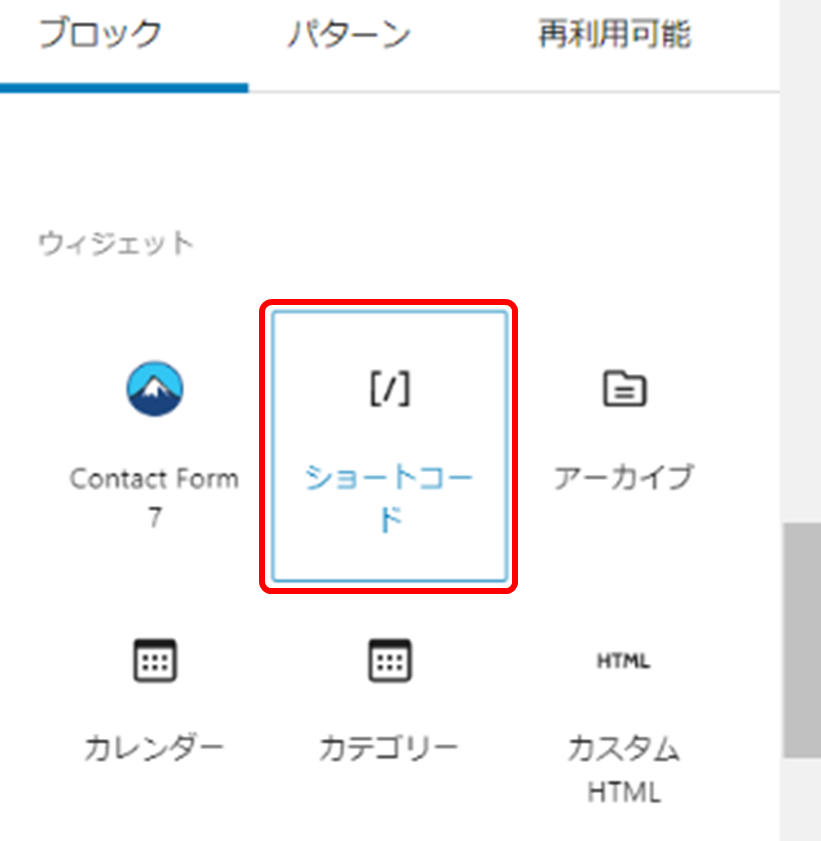

【ショートコード例】
[ contact-form-7 id="1234" title="お問い合わせページ" ]プレビューで確認
右上の「プレビュー」―「新しいタブでプレビュー」
をクリックして、確認します。
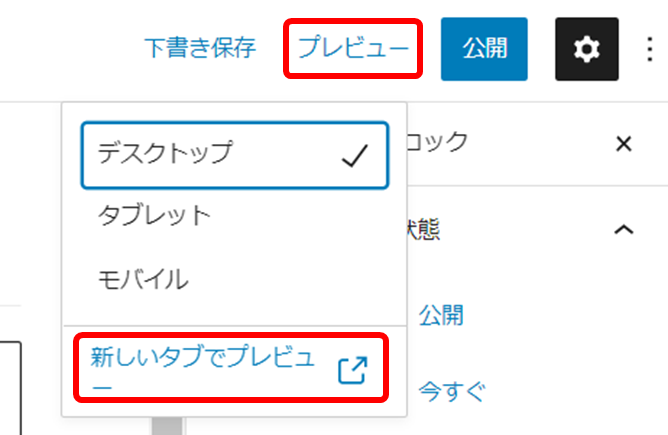
お問い合わせページが出れば成功です!
自分宛に送信して、動作を確認しておきましょう。

スパムメール対策【図解】
reCAPTCHAとは?
reCAPTCHAとは、botと人間を区別するための
Googleが提供している無料のサービスです。
皆さん、よく「私はロボットではありません」
と表示され、次のようなロゴのフォームを見かけたことがあるかと思います。

botによるスパム対策として導入をおすすめします。
スパム対策にも役立ちますし、サイトの信頼性向上にもつながります。

reCAPTCHAを導入する
reCAPTCHA V3のAPIキーを取得する
Google公式のreCAPTCHAページにアクセスします。
【ここから「Google reCAPTCHAページ」の操作説明です。】

Googleアカウントでログインします。
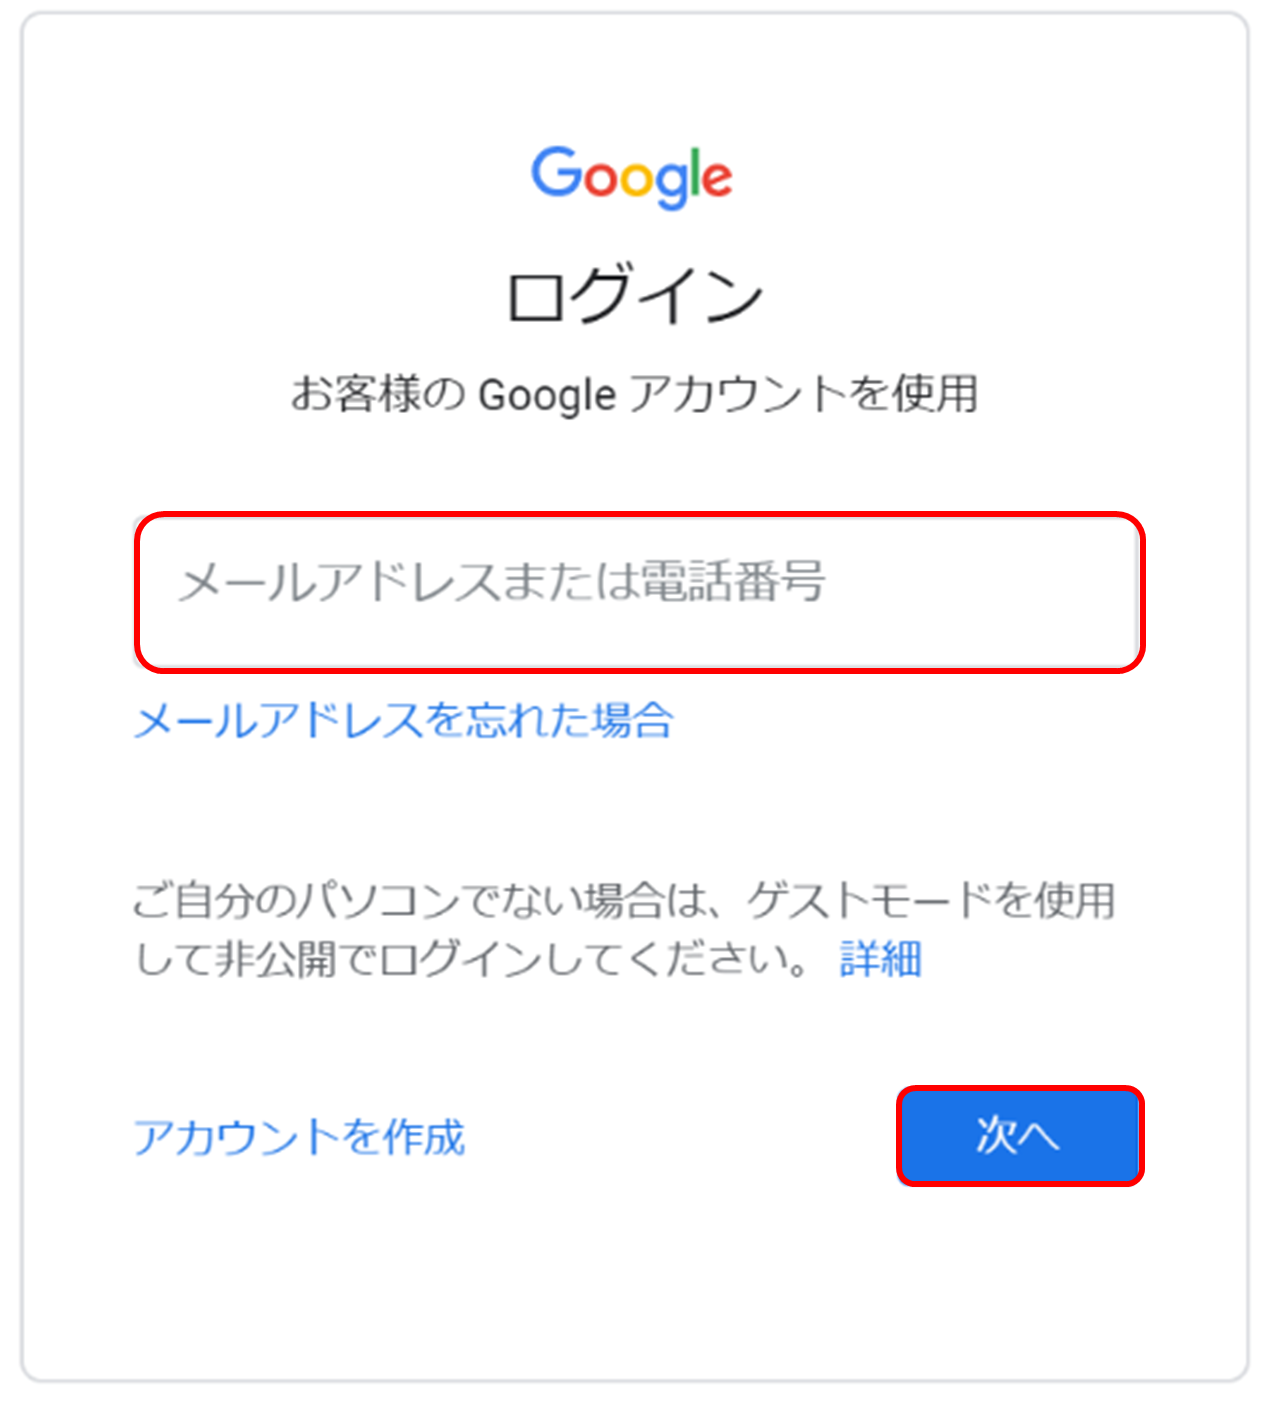
パス―ワードを入力してログイン。
・登録するサイトのURL
・reCAPTCHA v3にチェック
・登録するドメイン
・メールアドレス
を入力します。
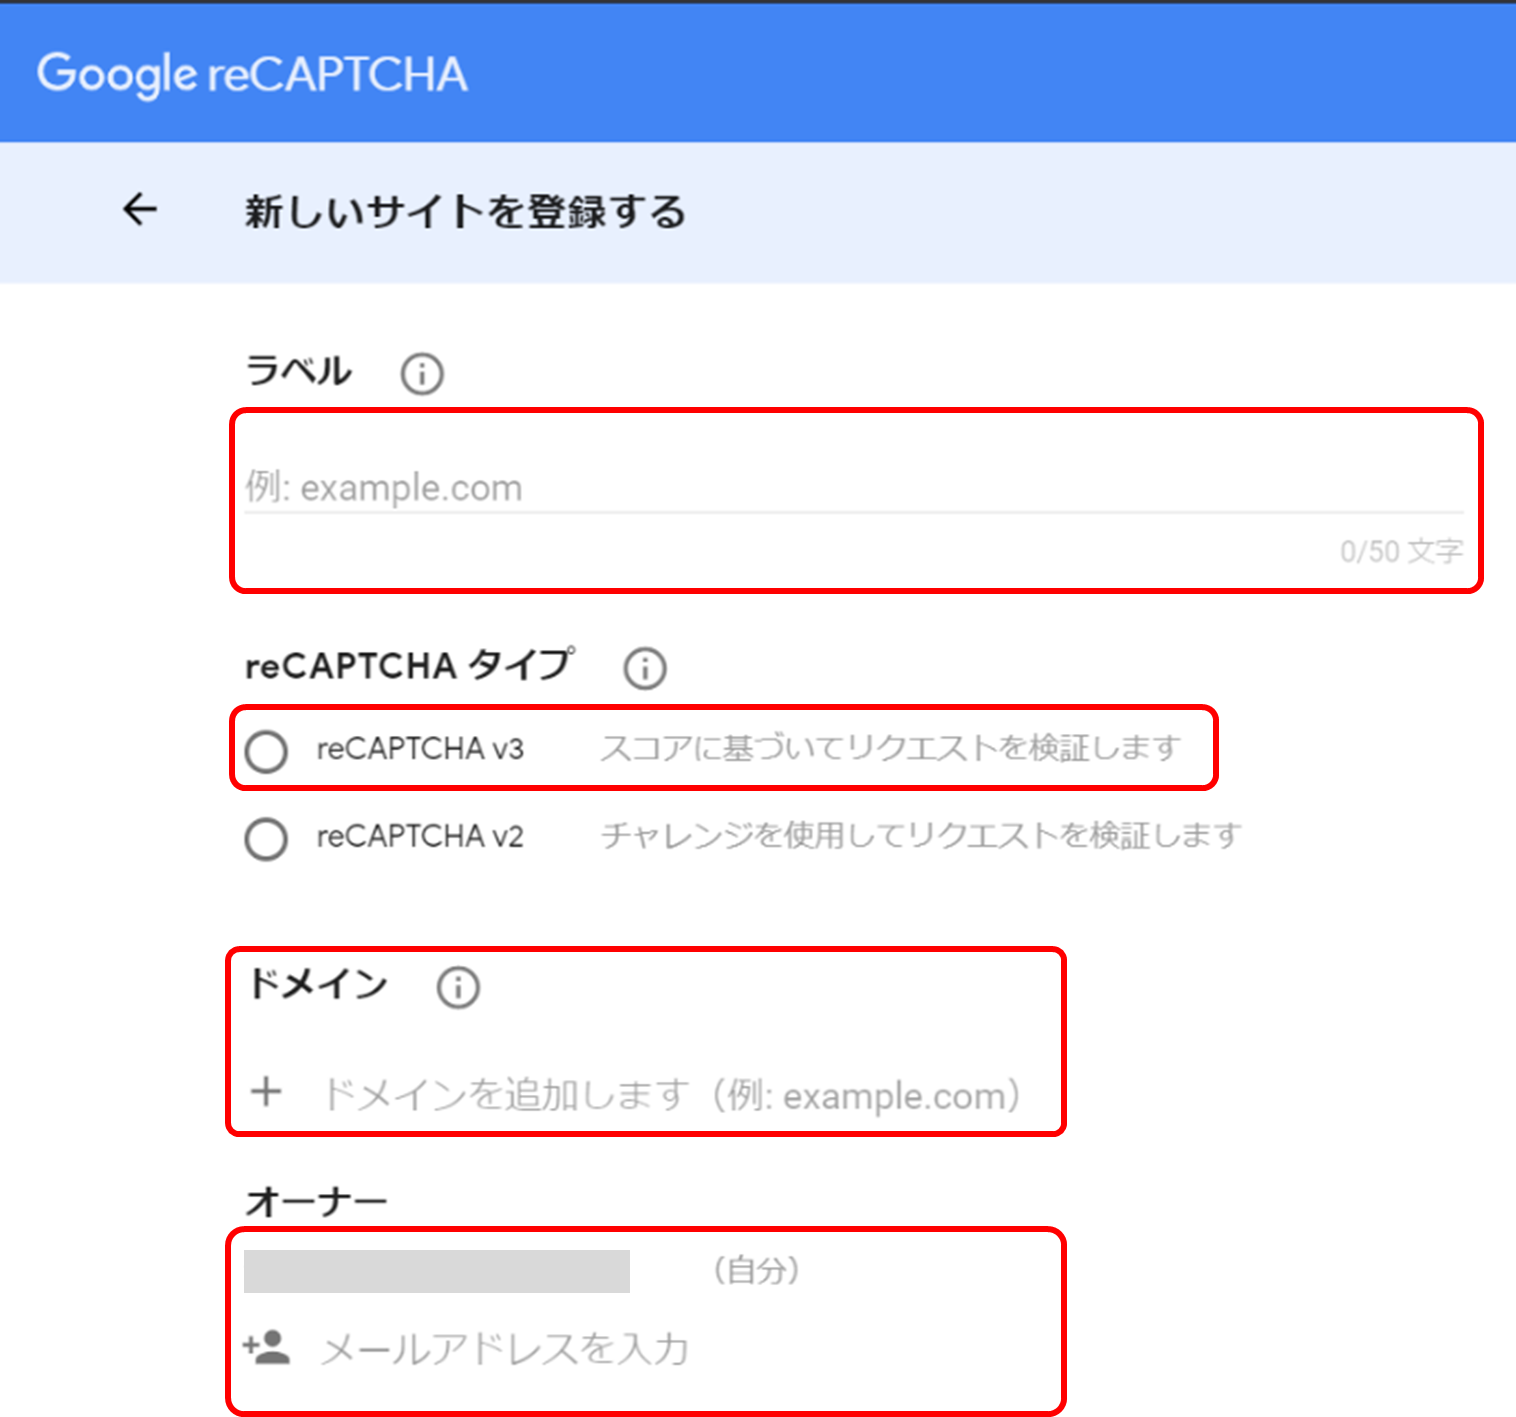
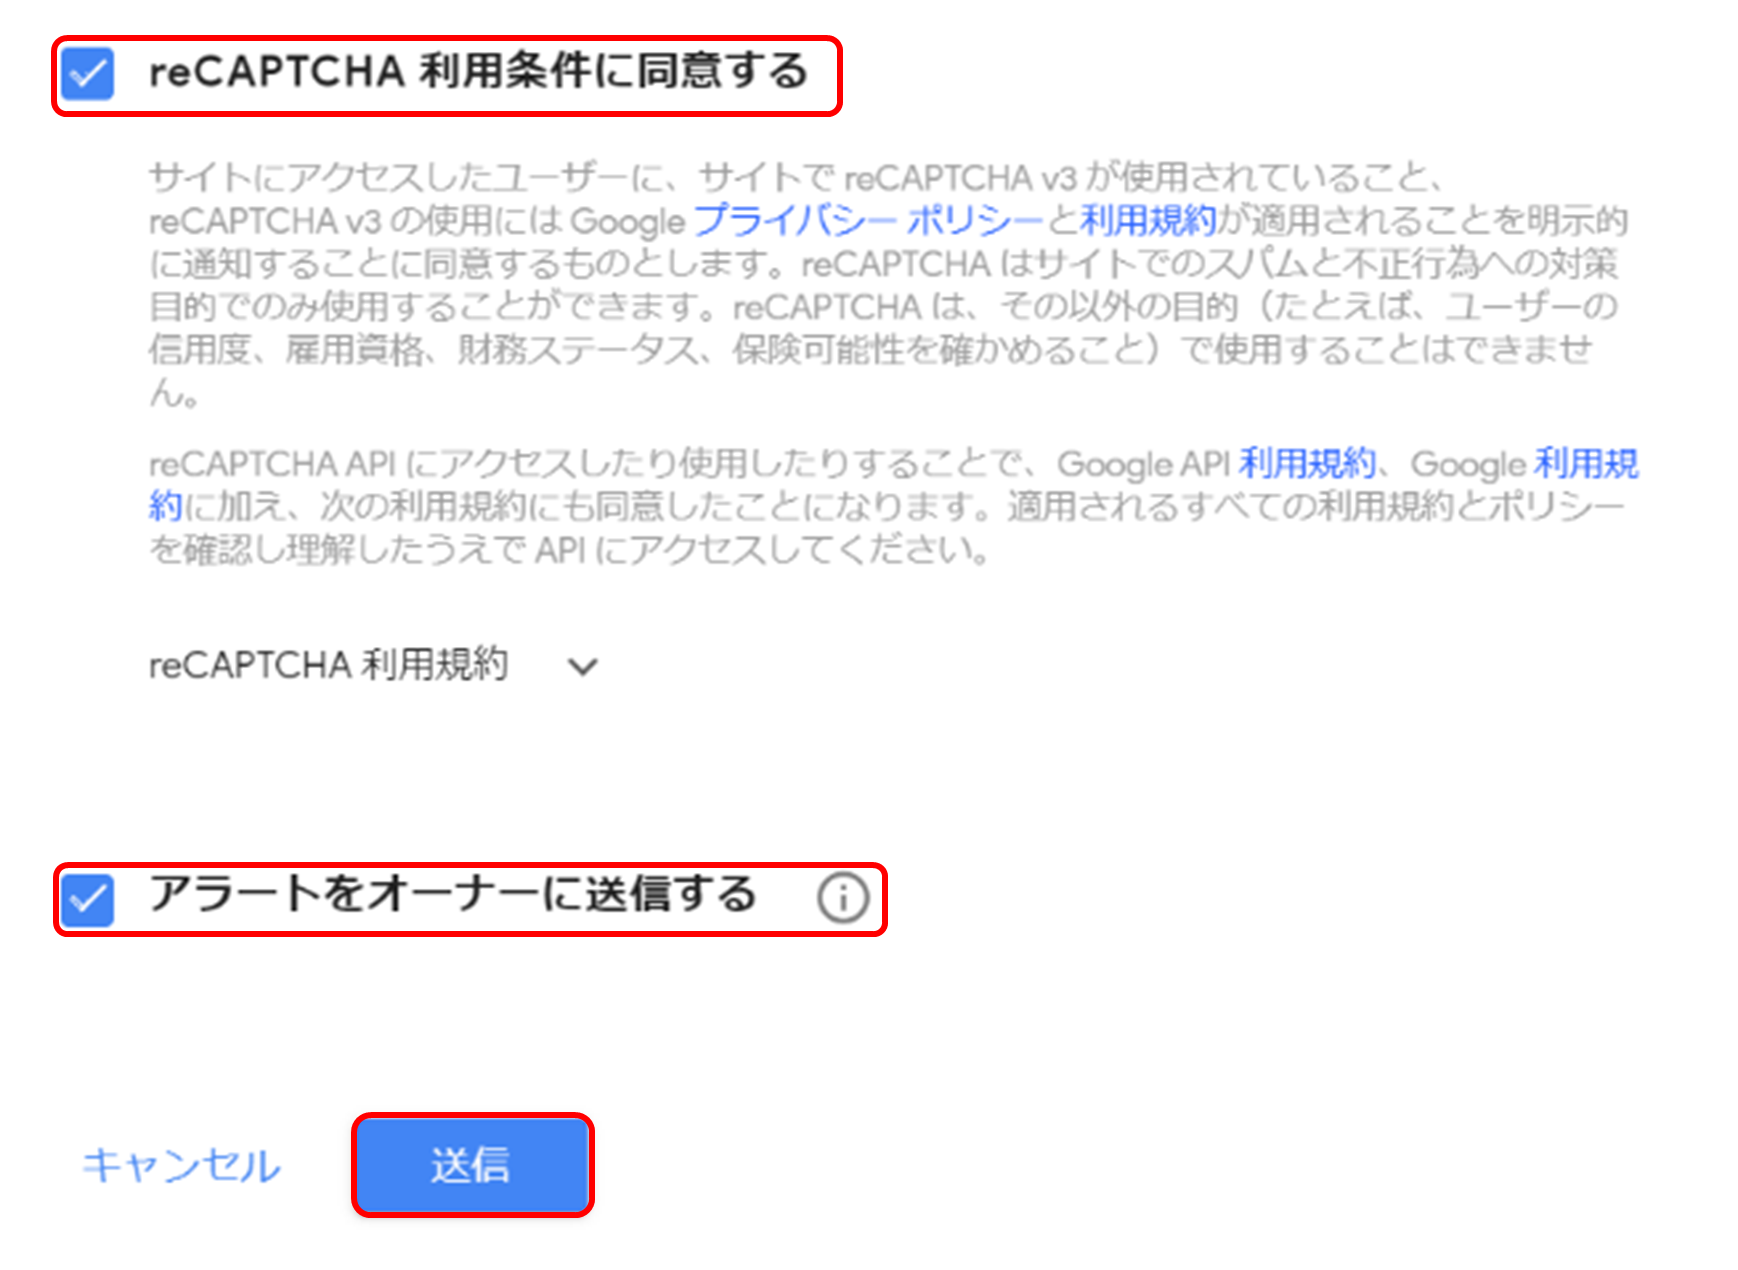
・「reCAPTCHA利用条件に同意する」にチェック
・「アラートをオーナーに送信する」にチェック
・「送信」ボタンをクリックします。
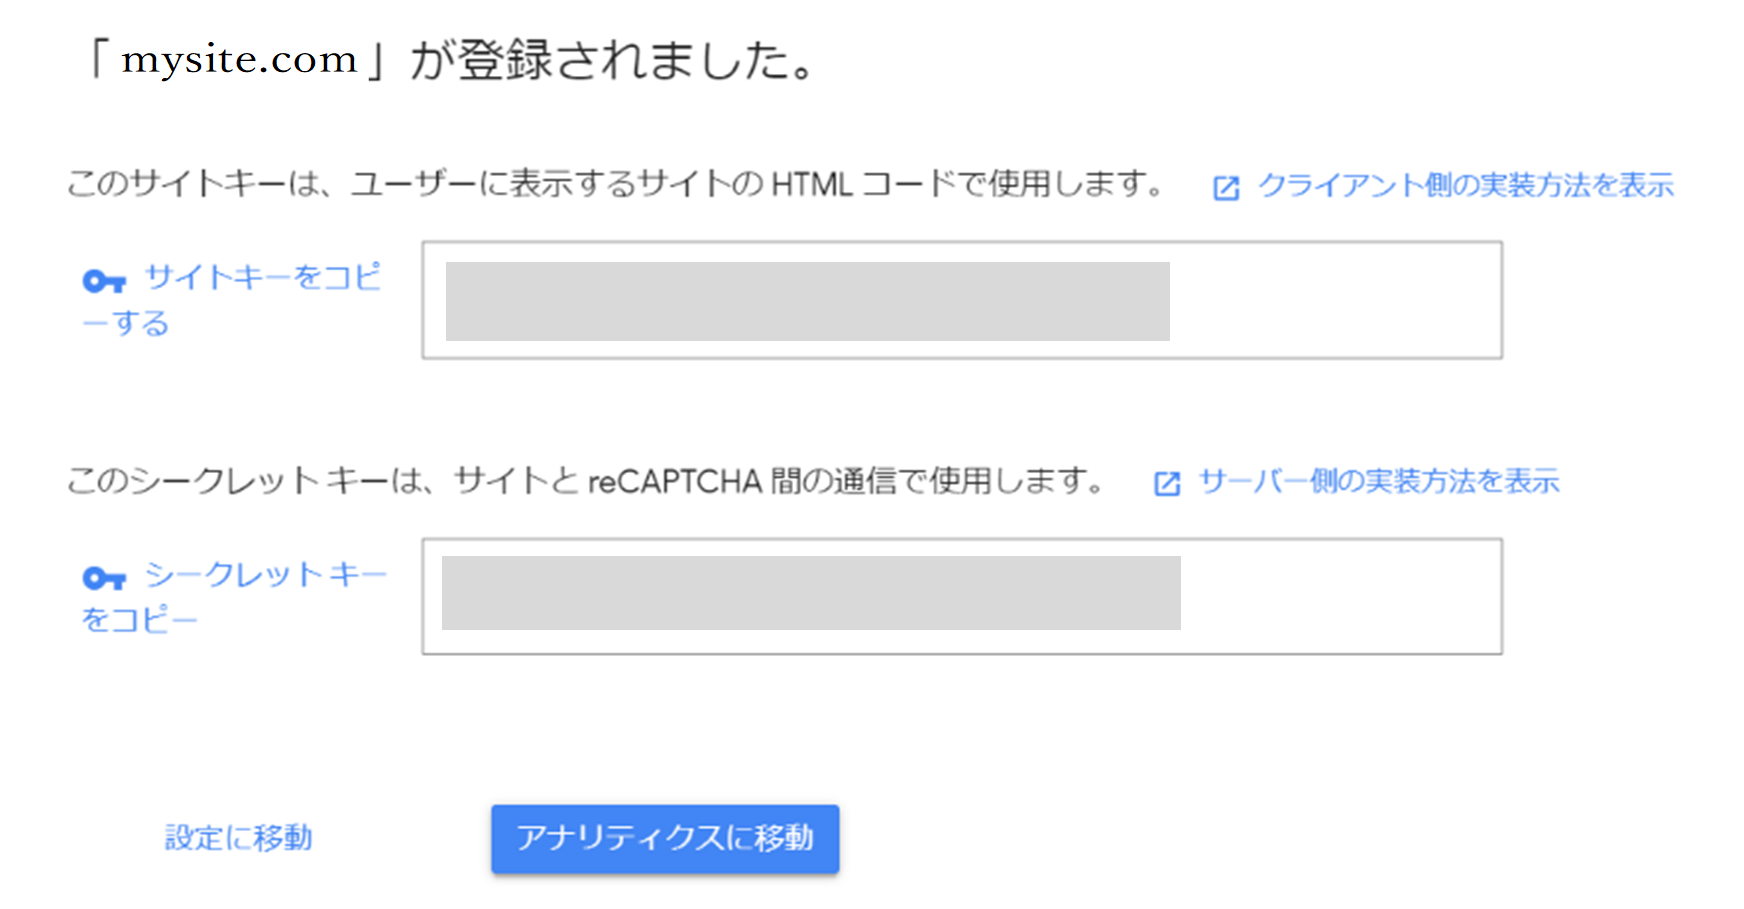
登録が完了すると、
「サイトキー」「シークレットー」
が表示されます。
自サイトの設定に必要です。
大切に情報を保管しておいてください。
【ここまでで「Google reCAPTCHAページ」の操作説明は終了です。】
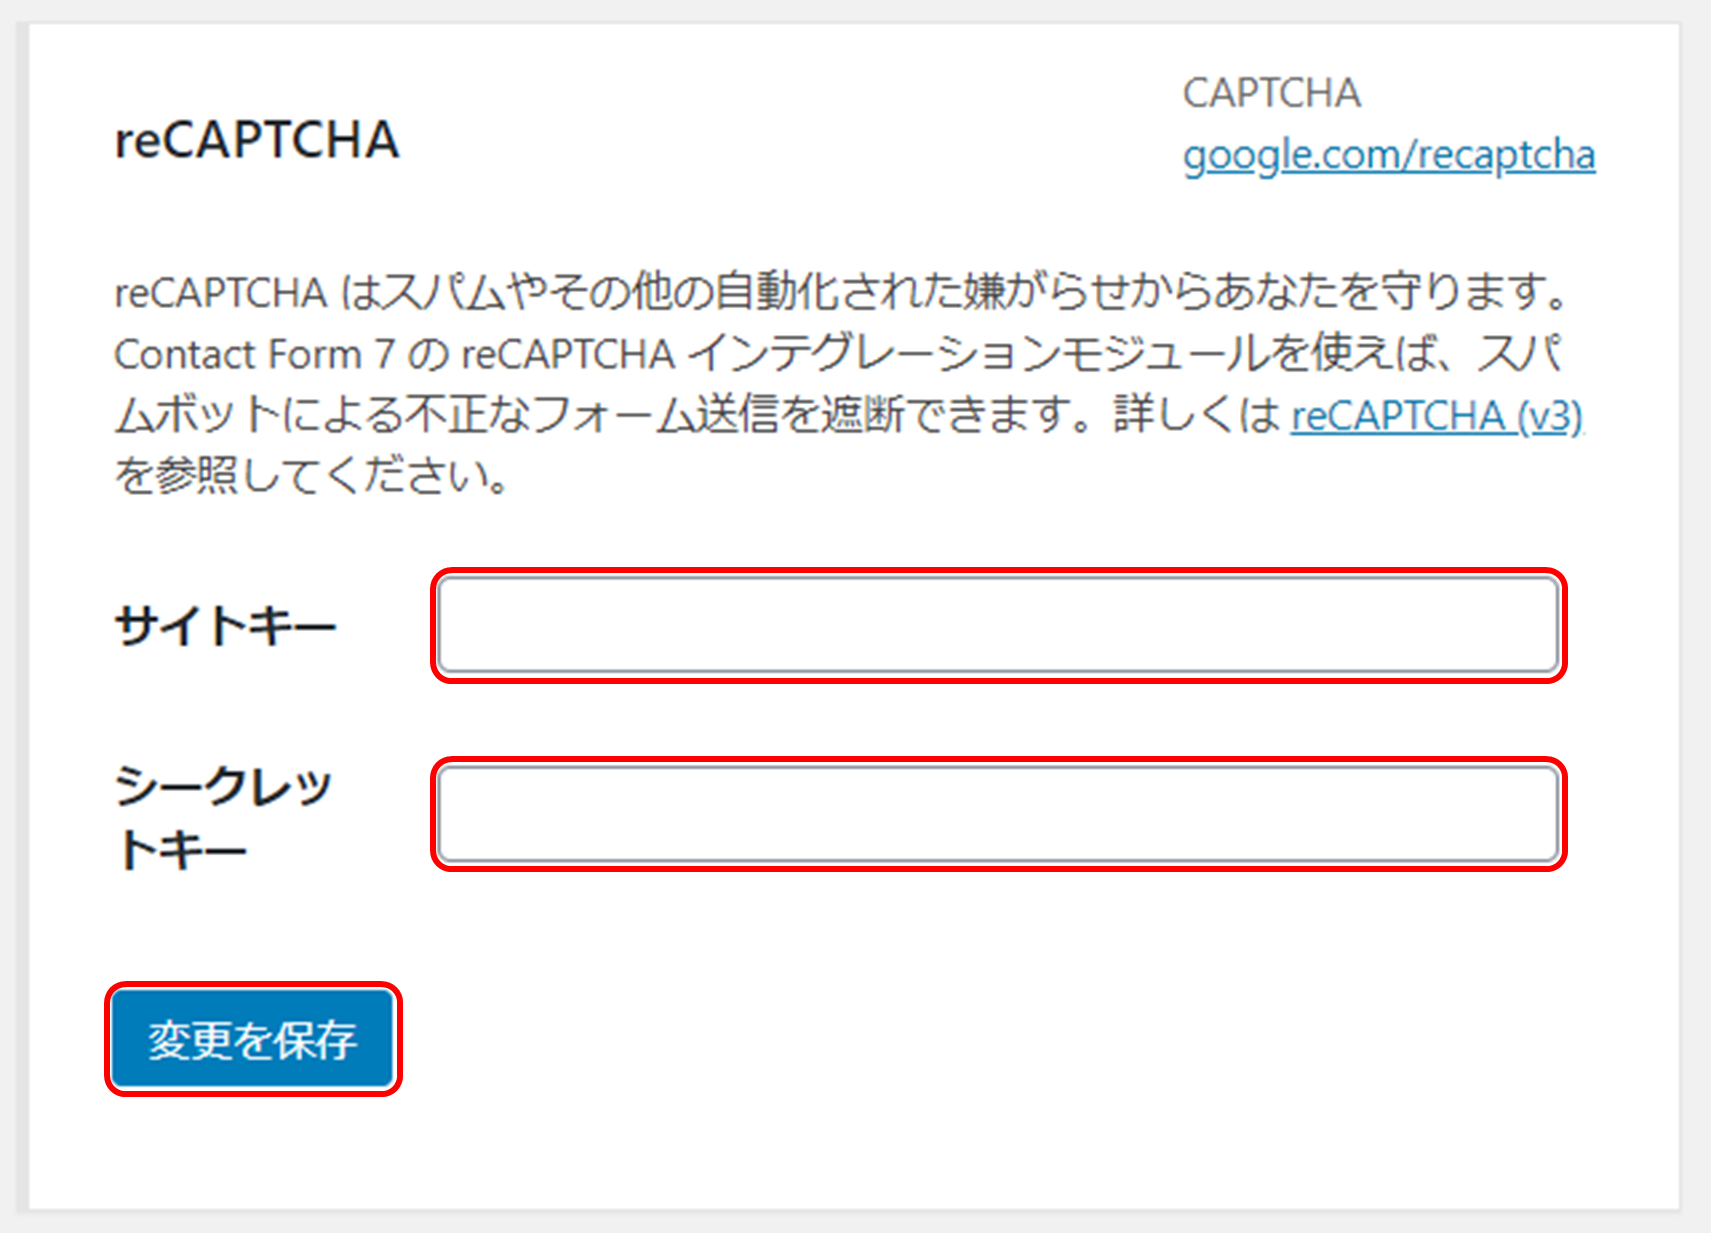
ContactForm7にreCAPTCHAを設定する
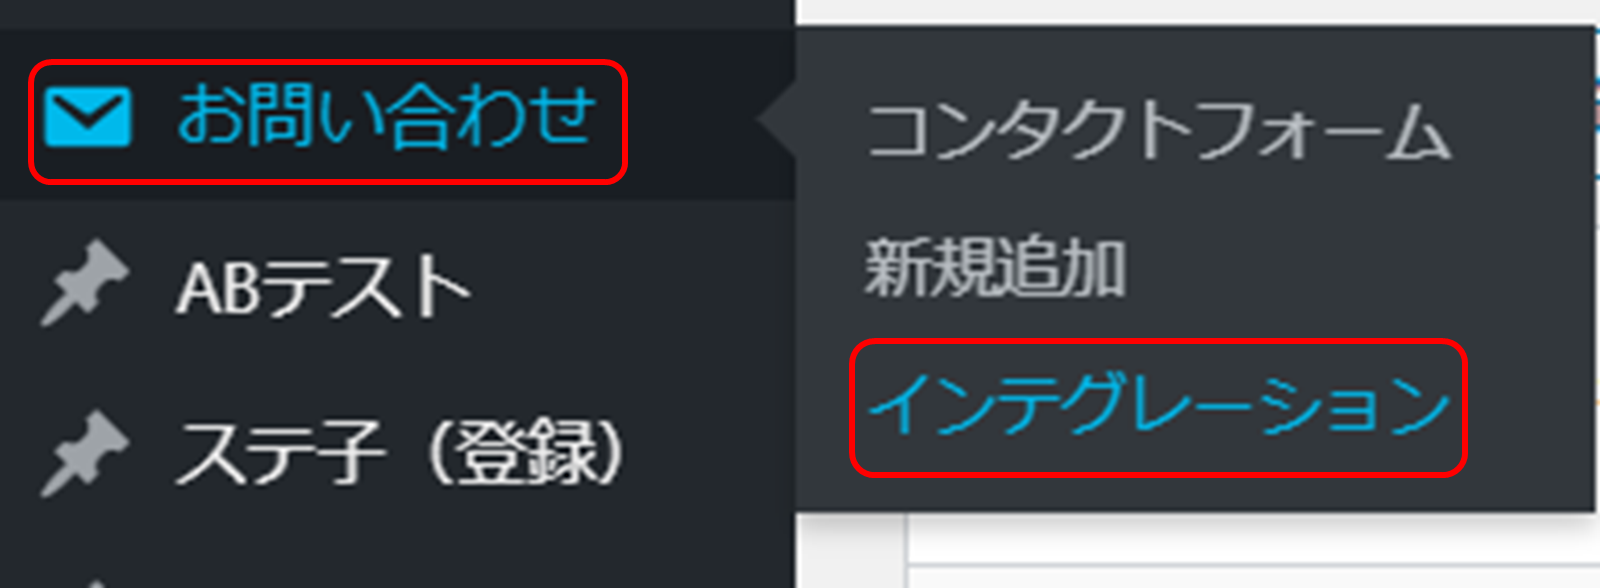
WordPressの管理画面から、
「お問い合わせ」ー「インテグレーション」
を選択します。
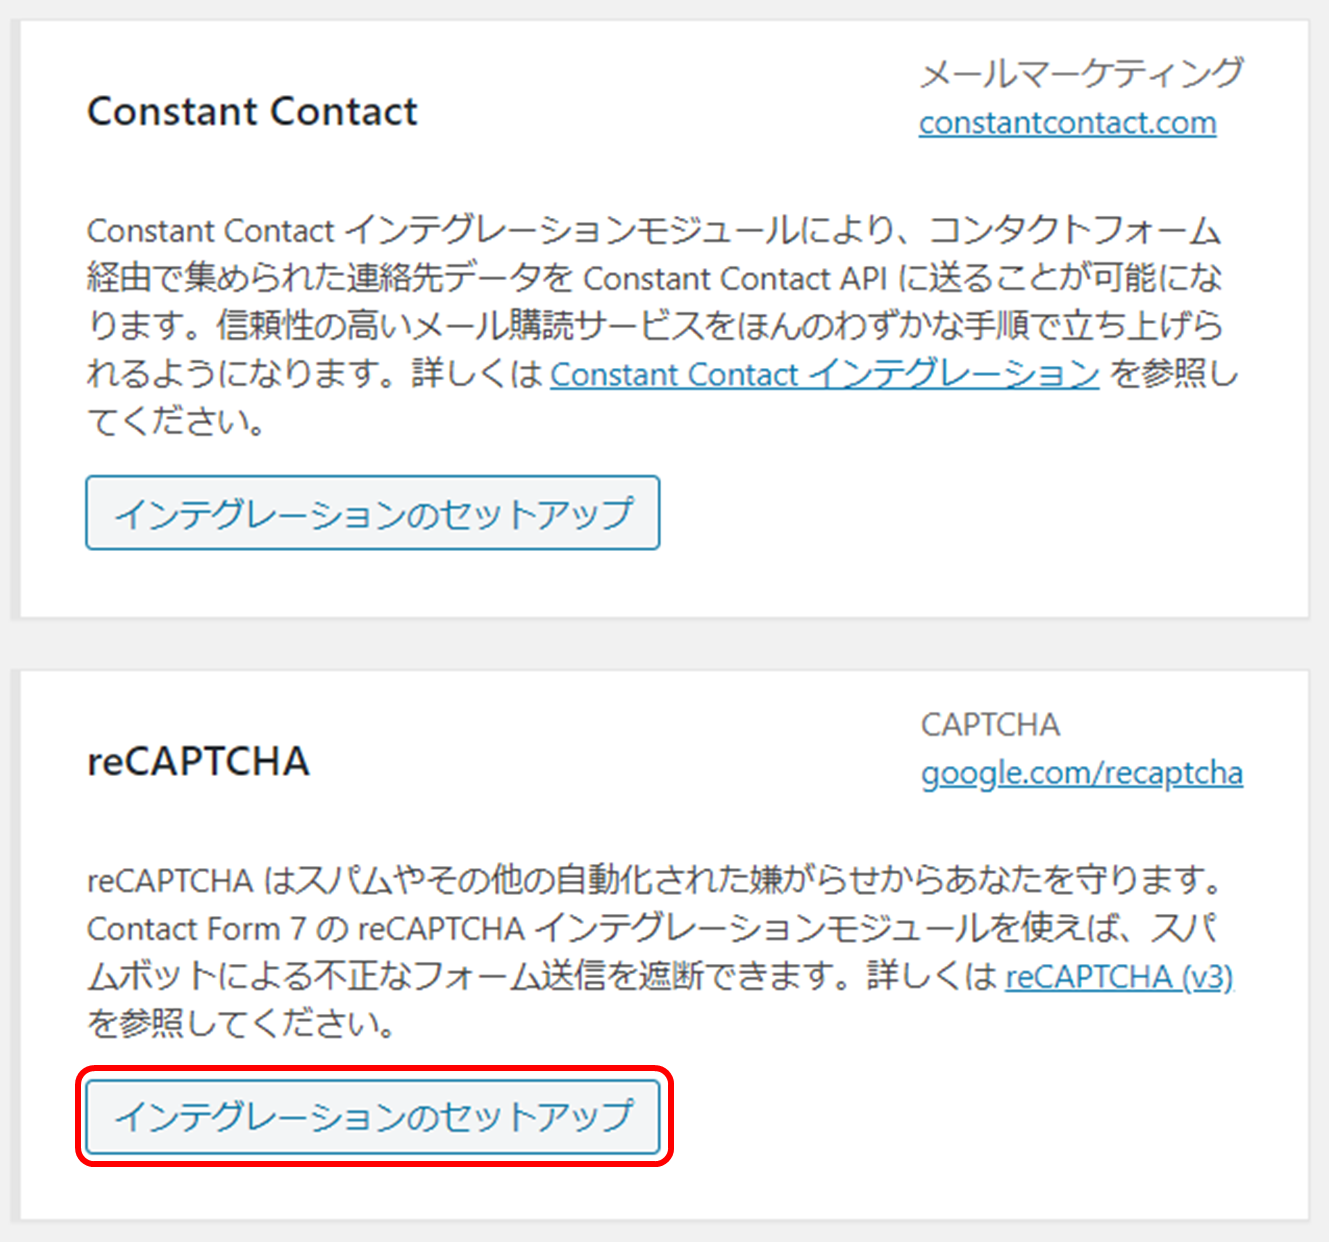
reCAPTCHAの
「インテグレーションのセットアップ」
をクリックします。
reCAPTCHAで登録して取得した、
「サイト―キー」
「シークレットキー」
を入力して、「変更を保存」をクリックします。
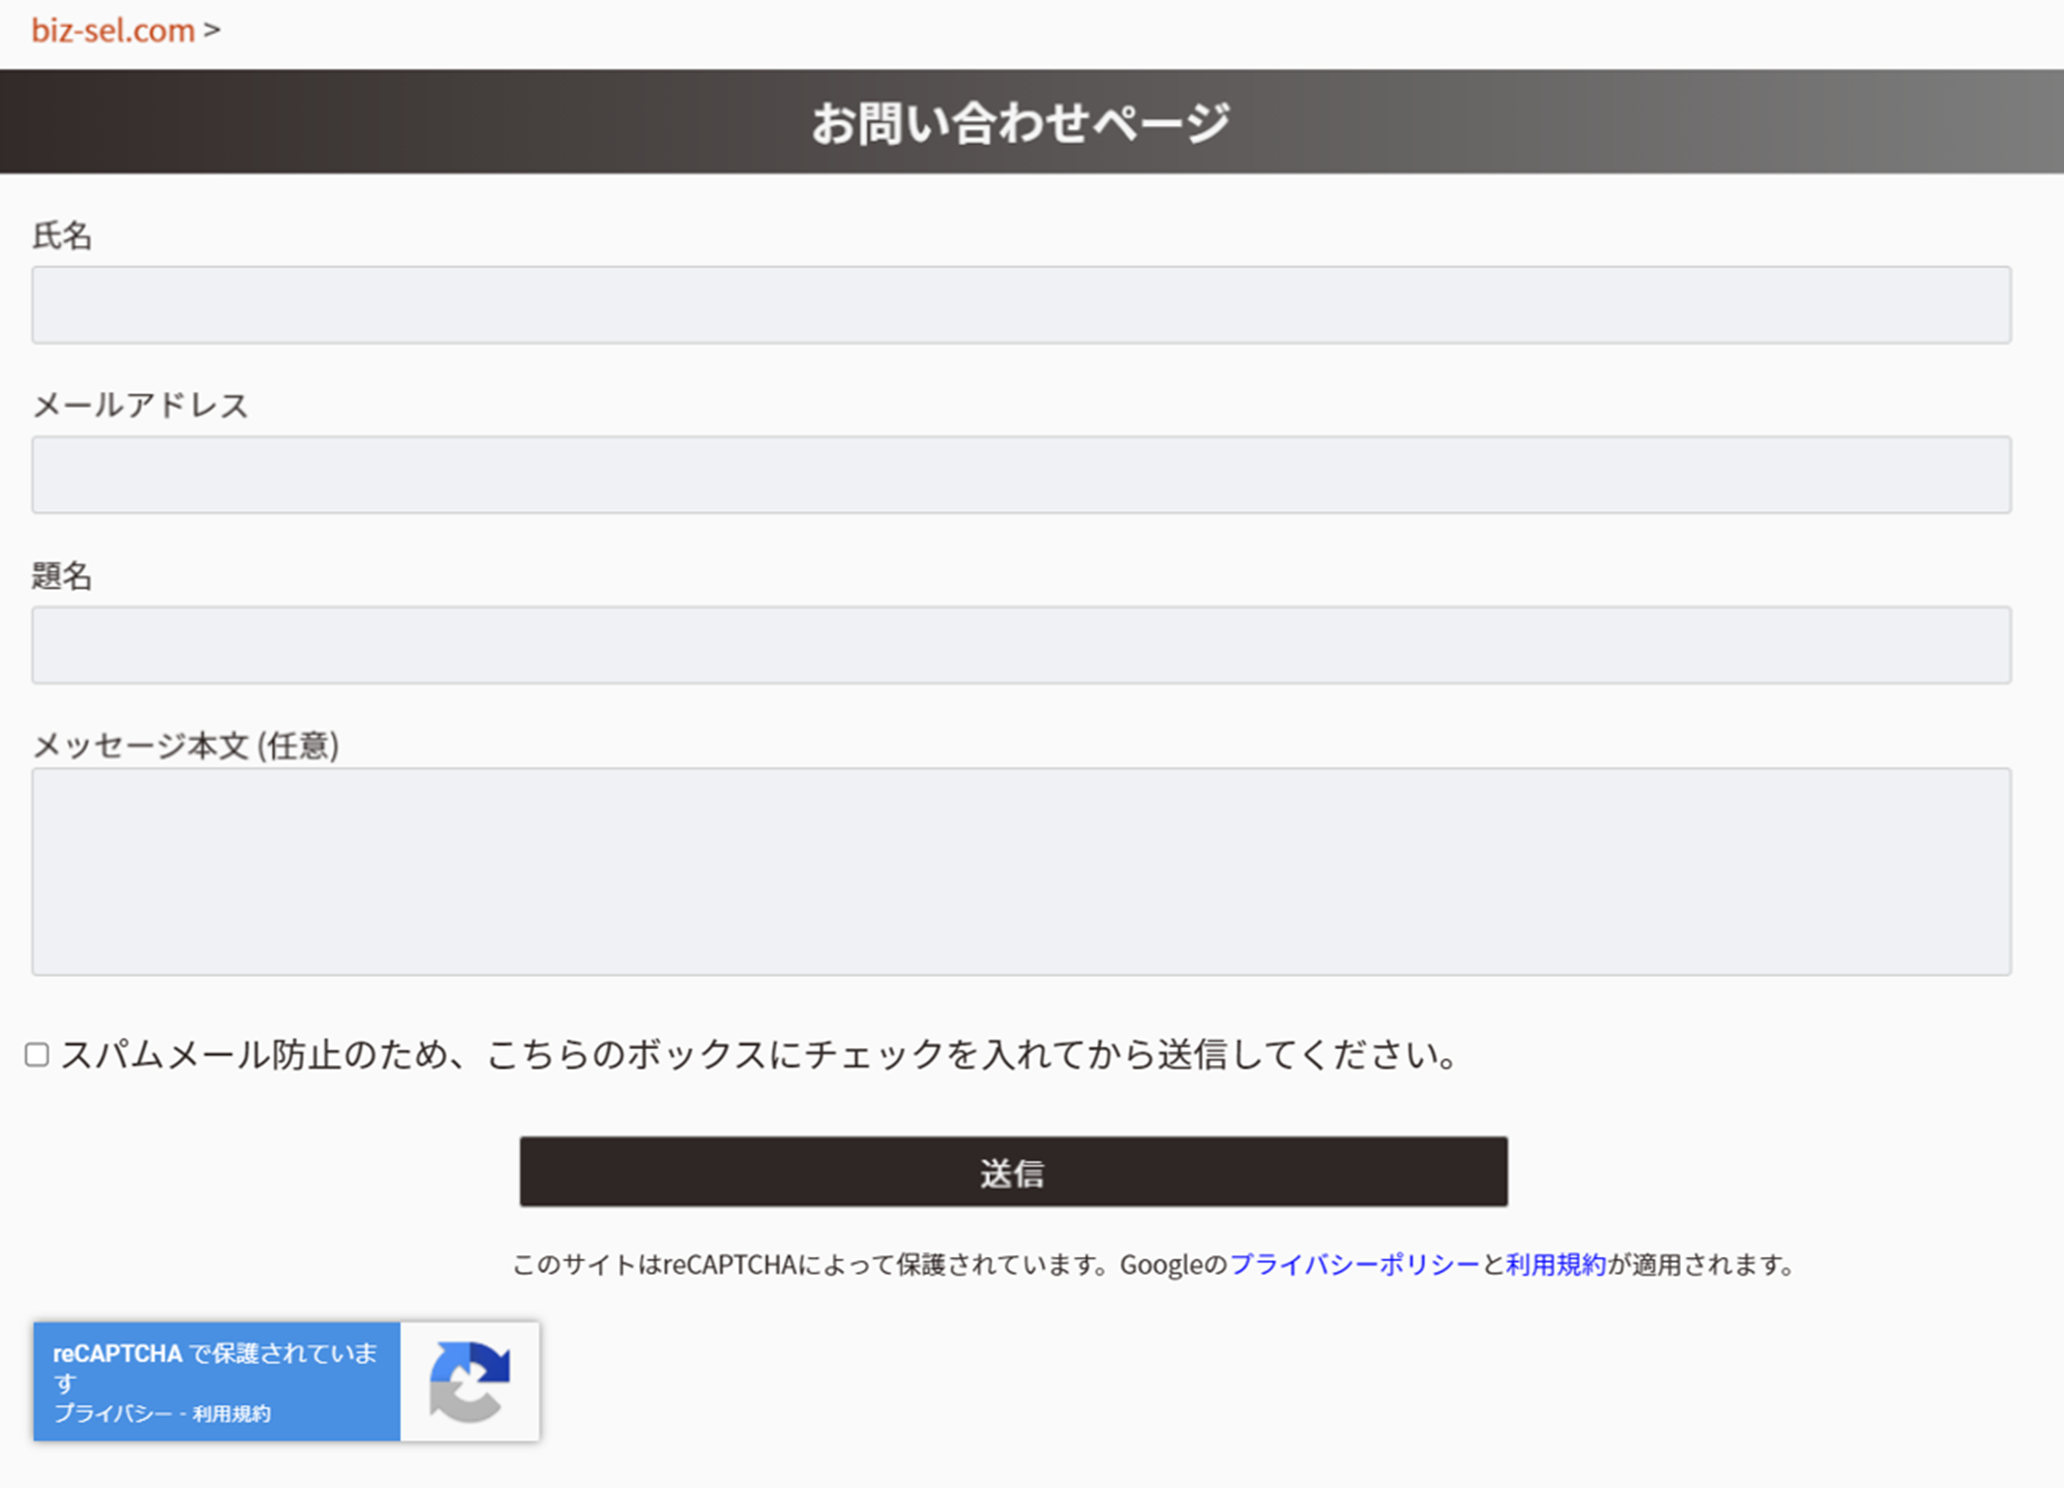
お問い合わせフォームを表示します。
送信ボタンのところに、
reCAPTCHAが表示されていれば成功です!
これで安心して問い合わせフォームを
設置して運用することができると思います。
どうぞ参考にしてください。

